In Sparkle, you can make elements on your website come to life with animation. There are two main types: one happens when an element appears on the screen, and the other is linked to the action of scrolling through the page.
One-Time Animation
One-time animation creates an effect when an element first shows up. You have lots of effects to choose from, but you won't see them on the Sparkle canvas; you'll need to preview your site to check them out.
When an element comes into view, the animation kicks in. It can start either when the element appears or after a bit more scrolling. You can control how far the element needs to scroll before the animation starts. If the element is already on the screen when the page loads, the animation starts right away.
You can also control the delay and duration of the animation. This is handy if you're animating multiple elements and want them to start at different times for a smoother effect.
In the example here, text has been set to animate after coming into a fixed position in the browser viewport. It’s been set to repeat the animation 5 times before stopping. If you don’t see the animated text, scroll the page until it starts, or increase the height of your browser window - it’s been set to begin 600 px from the bottom of the browser viewport.
This is an example of animated text using the Zoom effect, coupled with the ‘Move Up Subtle’ option
Just a heads up: too much animation can sometimes annoy visitors, especially if it feels like ads. So, use it wisely and avoid overdoing it, especially with repetitive animations. Also, animations at the top of the page might confuse people into thinking the page is loading slowly.
Animate While Scrolling
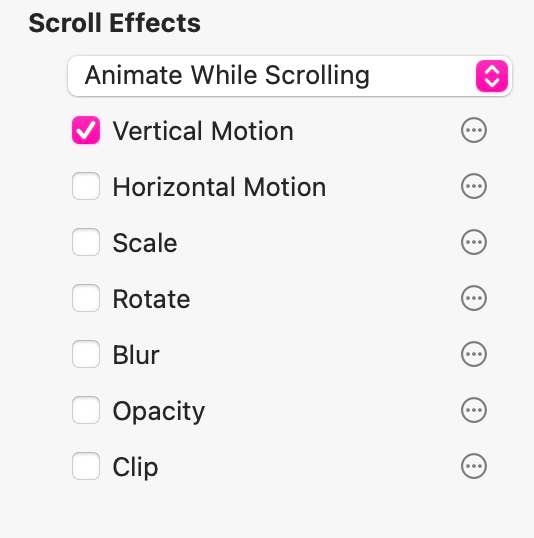
Animations tied to scrolling give your website a dynamic feel. You can play around with different effects like vertical and horizontal scrolling, scaling, rotating, blurring, and changing opacity.
Each effect has a "viewport" range, which controls when the animation starts and stops as you scroll. For example, an element typically starts moving when it enters the viewport and stops when it leaves.
You can also choose where the animation starts on the element: at the top, middle, or bottom. This is handy for animations near the top of the page.
Here's a breakdown of some effects:
In the example here, we’ve applied an opacity effect to the various elements to create a changing color effect as the page is scrolled.
Each effect has its own settings, like speed for scrolling effects and degree of rotation. You can get really creative by combining effects and make your website really stand out!
In this example, we can see the ‘vertical Motion’ effect applied to four boxes. As the page scrolls, the boxes move upwards - revealing some hidden text beneath them. Each box moves a slightly different distance because they’ve all been set to travel at different speeds - essentially, the faster the speed, the sooner the element reaches its destination at the end of the animation.
One
Step
At a
Time
Applying One Time Animations
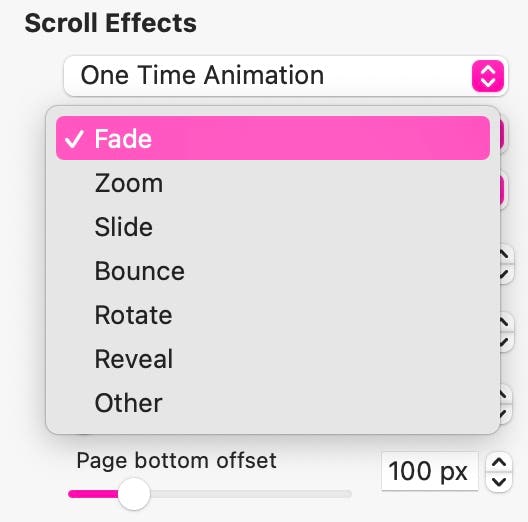
All animations are applied through the style panel on the right of the screen under the section named ‘Scroll Effects’. There you will see the option to apply one-time animations. Selecting that option will present you with a number of effects that can be applied. Just select an effect of your choice to apply it to your selected element on the canvas. If you select the ‘Other’ option, a secondary list of animations will appear, extending your choices even further.
When you select an animation, a number of other options present themselves, allowing you to choose different types of movements for your animation, the duration of the animation, a delay time before the animation starts, and a number of repeats before the animation stops. One final option allows you to set the distance from the bottom of the browser viewport that the element must reach before the animation starts. Clearly, if you don’t set an offset, the whole animation may start and end before anyone actually sees it on the page.

Applying Scroll Animations
Scroll animations are applied by selecting the ‘Animate while scrolling’ option in the ‘Scroll Effects section of the style panel. There you will find all the basic scrolling effects that can be applied to elements on your canvas. Just select an effect and then adjust the settings to achieve the effect you want to create.
You adjust the settings by clicking on the settings icon on the right of the effect name. It looks like this:
Before we get into the settings we should first have a short discussion about how scrolling animations work.
Scrolling a web page is essentially moving the page contents from the bottom of the browser viewport up towards the top. Therefore, any scrolling animation can only start when the animated element appears at the bottom of the viewport, and can only end when it reaches the top of the viewport. Clearly, we don’t always want an animation to start at the very bottom of a browser window, and we don’t always want to wait for it to stop when it reaches the top of the window. Therefore, Sparkle allows you to set a viewport in which the action takes place - for clarity, we’ll refer to that viewport as an ‘Action Window’ This is essentially a part of the browser window that you designate as being the area of the screen where things move about.
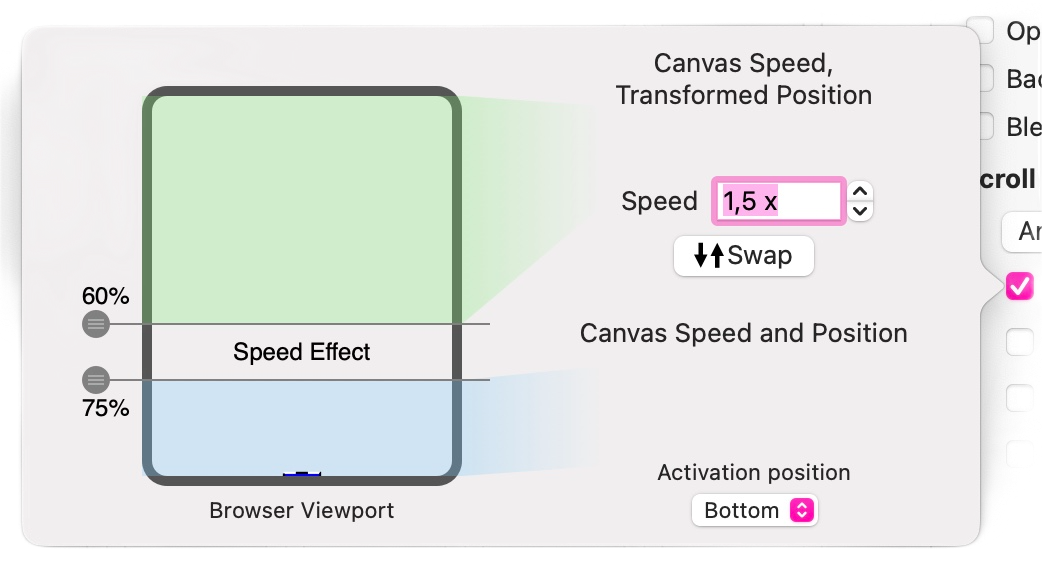
Sparkle makes it very easy to set up this ‘Action Window’ through a simple graphical settings interface. When you click on an effect’s settings icon, you will see a popup where the settings are made. On the left side of the popup is a graphical representation of a device screen. Within that screen are two markers. You can slide these markers up or down to create your ‘Action Window’. In this example, the markers have been set to 60% (top) and 75% (bottom). The white space in-between is our ‘Action Window’ where the effect takes place. This was the setting used for our sliding boxes example above.
Over on the right of the popup are effect-specific settings. Again, in this example of a vertical motion animation, we’ve set a speed of 1.5 times the speed of the scroll and we’ve told the animation to start when the bottom of the animated element is inside the ‘Action Window’. The end result? When the bottom of the element crosses the 75% marker, the element will begin its vertical movement upwards until it reaches the 60% marker. At that point, it stops moving. This assumes that the starting point of the element’s journey is the position it was placed on the canvas. But, what if we wanted it to start its movement sooner and end its movement at its canvas position? To do this we would click on the ‘Swap’ button to reverse the effect. Essentially, the element will start below its current position on the canvas and move upwards into its canvas position. The point at which the element starts its journey is determined by the bottom zone marker.

Settings Variations
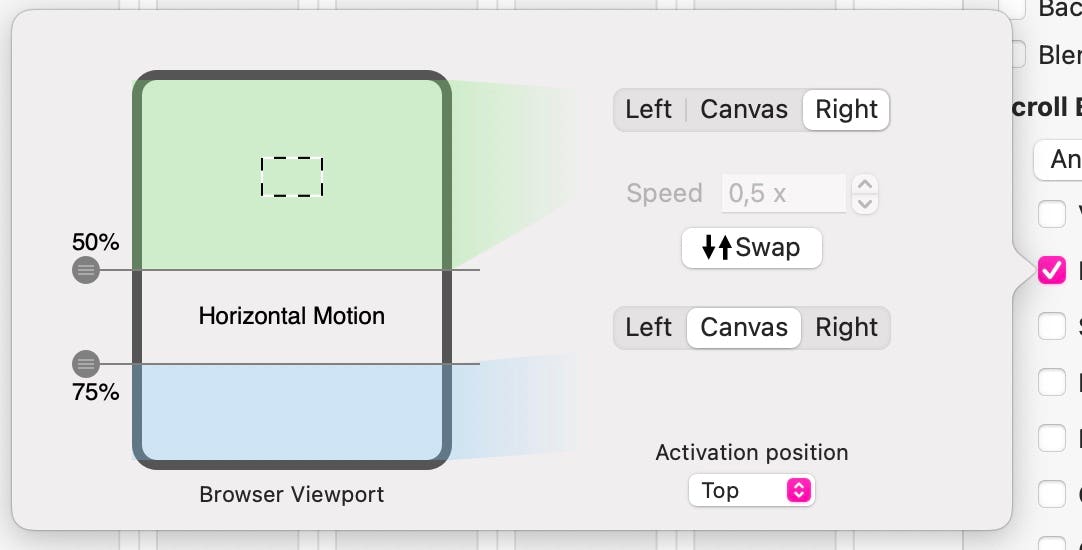
Each animation effect will have slightly different settings, but they all follow the same general principles. Set an ‘Action Window’ and then apply settings to achieve the desired effect. For example, with horizontal animations, you can set the direction of movement. In this example, we set an element to move from its canvas position towards the right of the screen. The bottom row of direction buttons tells the animation the starting position of the element, whilst the top direction buttons show the direction of movement.
The thing to note about horizontal animation is that the route of travel is unlimited - essentially, the element will move right off the screen edge during the time it takes to scroll through the ‘Action Window’. So, the bigger the ‘Action Window’, the longer it will take for the animation to complete. If you wanted to restrict the horizontal motion so that the element doesn’t fly completely off the screen, you can set both sets of direction buttons to ‘Canvas’. This will allow you to set a scroll speed, which basically restricts the movement. This results in the animation starting when the element enters the ‘Action Window’ and will stop when it exits the window. If the scroll speed is set low enough (typically below 1x), the animation will stop before it has time to fly off the edge of the screen. Here is an example of that effect. It uses a very small ‘Action Window’ and a low speed. If the window size was increased, the element would continue moving towards the right of the screen edge until the page scroll reaches the top of the ‘Action Window’
Final Thoughts
Animations can be a great asset for your website if used thoughtfully and with a purpose There are also wide variations in how they can be set up to achieve particular effects - it’s all about trying out everything and understanding what’s going on. In many respects, it’s a bit like learning to fly a helicopter - push the stick in a certain direction and watch what the helicopter does. If you want it do do that again - that’s where the stick goes. So, have a play with the animation options and get to understand how each option functions. With a little practice, you’ll become an animation master. You may not reach the dizzy heights of Walt Disney, but you will be able to apply some great effects to your Sparkle web pages.
To get you started we’ve made a Sparkle project file containing all the animations in this page - you’ll find the link below. Open the project file and select the animations. Then check the setting that have been used to create them.
Quick Video Tutorial
Please report any shortcoming in this documentation and we’ll fix it as soon as possible!
Updated for Sparkle 5.5
This website makes use of cookies.
Please see our privacy policy for details.
It’s Okay
Deny